4.4 Configure LVM LVs
We are almost done!
Use the up arrow key to scroll all the way up in the drive/partition map. This time, you should see a new option,
“Configure the Logical Volume Manager”. Select it and press ENTER.
When asked whether to “write the changes to disks and configure LVM”, select “Yes” and press ENTER. The VM make
take some time to rescan the partitions and drives.
In the LVM configuration screen, select “Create volume group” and press ENTER. This step make take some time to
complete.
When asked about the “volume group name”, use anything that you want to use (no space or any other special
characters). vg1 is a good name. Press ENTER.
When asked “Devices for the new volume group”, select /dev/md2 (use the spacebar) and press ENTER.
This should bring us back to the LVM configuration screen. This time, select “Create logical volume” and press ENTER.
You will need to do this a few times. Use the following steps for each LV:
-
1.
- select “Create logical volume”, press ENTER.
-
2.
- select “vg1” as the volume group.
-
3.
- for the “logical volume group”, use these names:
- root: this covers everything in the file system that is not a part of the “other” mount points.
- usr: this covers mostly programs.
- tmp: this covers the directory for temporary files.
- home: this covers the home directories of end users.
- var: this covers non-volatile state information of the system.
-
4.
- for the “logical volume size”, use the following sizes:
- root: because most of the “hefty” directories have their own LVs, this partition can be relatively small to
store mostly configuration files. Specify 140MB.
- usr: this includes all the executables, manual pages and documentation of executables. As a result, it has
to be a little bigger. Specify 240MB.
- tmp: this includes all the temporary files that are created when programs run. For a server, this directory
should remain relatively small. Specify 30MB.
- home: this includes all end-user specific files. The size of this partition depends mostly on the number of
end users and what they do with the server. For our example, it is safe to specify 50MB to begin with.
- var: this includes non-volatile states of various programs, including the cache of the package management
system. It has a potential to become very big. However, just to start, we can specify 250MB.
When everything is done, you can select “Display configuration details” in the LVM configuration screen. It should
display something like the following:

When everything is done, select “Finish” in the LVM configuration screen and press ENTER. In the partition/drive map,
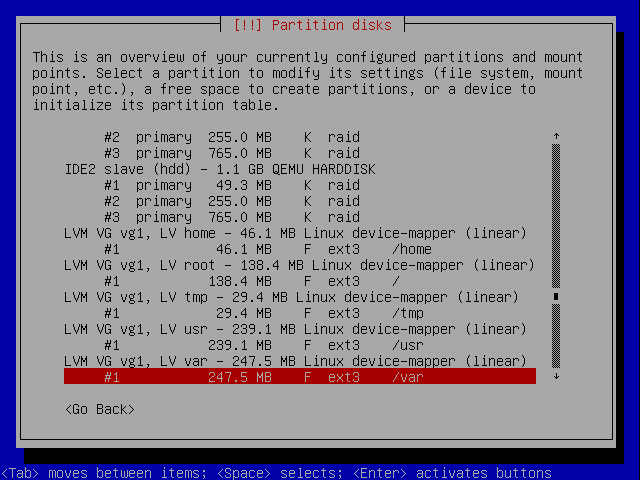
scroll almost to the bottom using the down arrow key, you should see the newly created logical volumes.
For each LV, do the following:
-
1.
- select the “#1...” line below the “LVM VG vg1, LV...” line, press ENTER.
-
2.
- in the “partition settings” screen, select “Use as ...”, press ENTER.
-
3.
- select “Ext3 journaling file system”, press ENTER.
-
4.
- back in the “partition settings”, select “Mount point”, press ENTER.
-
5.
- the mount point should be the same as the name of the LV. In other words, the mount point of home should
be /home, and so on.
-
6.
- back in the “partition settings” screen, select “done setting up the partition” and press ENTER.
When all the LVs are configured, you should see the following in the partition/drive map: