At this point, we have configured all the partitions of all the drives. However, these partitions are all unrelated. Next, we construct the RAID devices.
Use the up arrow key and select “Configure software RAID”, press ENTER. Select “Yes” when asked whether to “write the changes to the storage devices and configure RAID”.
The next screen lets you configure multidisk and software RAID. Select “Create MD device” and press ENTER. The boot device can only be a RAID1 device, select “RAID1” and press ENTER.
Since we have three hard disks, specify 3 when asked “number of active devices for the RAID1 array”. Press ENTER. This leaves us with 0 for the “number of spare devices for the RAID1 array”.
When asked to choose the active devices, use the SPACEBAR to select the following devices (the 50MB partitions):
Press ENTER to continue.
You should be brought back to the “Multidisk (MD) and software RAID configuration menu”. Select “Create MD device” to create the swap device. Press ENTER.
This time, you can use RAID5 for the swap device. Press ENTER after selecting RAID5.
Because a RAID5 array requires at least 3 active devices, press ENTER to accept the default when asked “number of active devices for the RAID5 array”. Press ENTER.
This also leaves us with no spare devices. Press ENTER to accept the default of “number of spare devices for the RAID5 array”.
When asked to select the active devices for the RAID5 device, select the following:
Press ENTER to continue. This brings us back to the MD and RAID configuration menu. Select “Create MD device” one last time and press ENTER.
The main portion of the file system should use RAID5. Select RAID5 and press ENTER.
Accept the default when asked “number of active devices for the RAID5 array”, press ENTER.
Accept the default when asked “number of spare devices for the RAID5 array”, press ENTER.
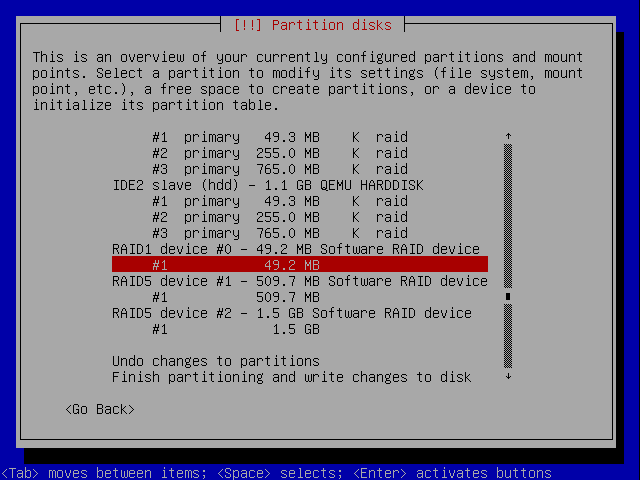
Select all the remaining partitions when asked to select “active devices for the RAID5 multidisk device”. Press ENTER. This bring us back to the MD/RAID configuration menu. Select “Finish” and press ENTER. Note that it may take a while for the VM to scan the disks/partitions again once the RAID configuration is completed. Once completed, the installer should return to the partition/drive map. Scroll all the way to the bottom to see the newly constructed RAID devices.
At this point, we have constructed the components of RAID devices and three RAID devices.